
Kit Instructions
Supply List (included)
- 3 SAFinger® overlays
- 3 Mixing Bottles
Additional Supplies (not included)
- Simulated Blood Glucose Solution (see below)
- Needles 27 gauge
- Syringes 3 ml
- Lancets: 28-29 gauge and 30-32 gauge
- Lancet Device
- Glucometer and Glucometer Test Strips
- Alcohol Pads, Gauze Pads, Gloves
Instructions to Learner
The lancet needs to puncture the bladder area to obtain the simulated blood drop. If no simulated blood is obtained, reposition and apply pressure per protocol.
Mixing Instructions for Simulated Blood Glucose Solution
| Distilled Water (ml) | 10 | 10 | 10 | 10 |
|---|---|---|---|---|
| Fake Blood Gel (ml) | 7.5 | 7.5 | 7.5 | 7.5 |
| Glucose (ml) | 0.5 | 1 | 2 | 4 |
| Anticipated Glucose Range | Low | 70-120 | 150-300 | >300 |
- Fake Blood Gel must have thick consistency.
- The product used for these instructions is Rubies Fake Blood Theatrical.
- This ingredient prevents leaking from puncture site.
- If bleeding from puncture site is desired, increase the distilled-water-to-blood-gel ratio.
- The glucose product should yield approximately 80 calories per 12 fluid ounces.
- The product used for these instructions is Gatorade G Series sports drink.
- After mixing, check glucose with glucometer. Add glucose product for the desired result.
- If precise glucose level is needed for scenario, filled SAFinger® overlay should be tested immediately prior to use.
- Refill SAFinger® overlay until puncture site has drop of blood.
Disclaimer
- Parts of the SAFinger® overlay contain silicone.
- SAFinger® overlay plastic guard protects mannequin/patient hand from puncture. Puncture is possible outside guard. SAFinger® overlay has no guarantee to not leak if used for multiple punctures and pre-puncture option is not used.
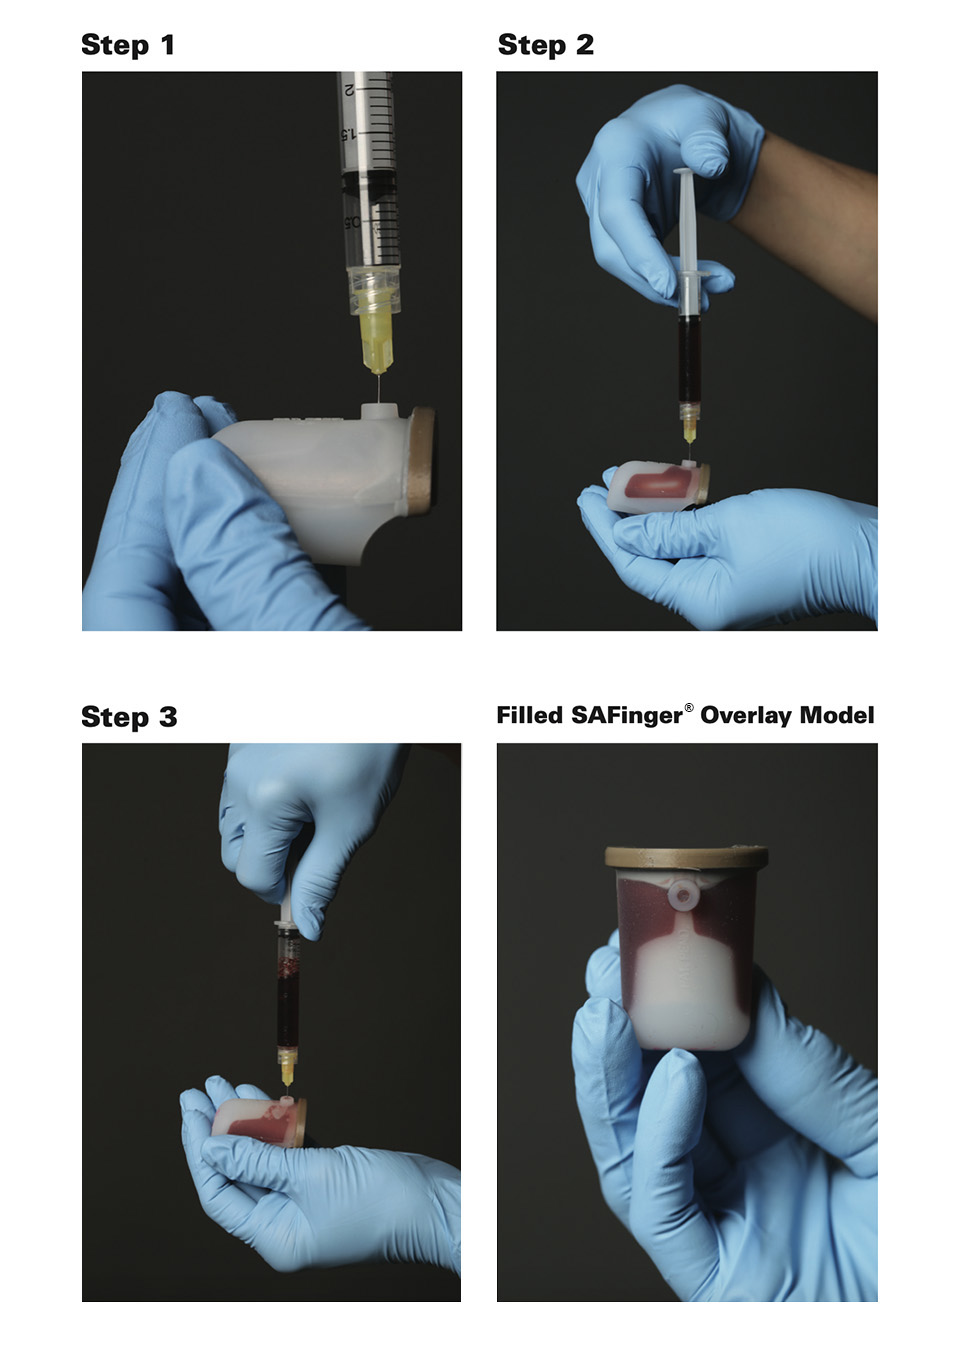
Preparation
Preparing the SAFinger® Overlay
- Remove air from the SAFinger® overlay:
- Insert 27 g needle/3 ml syringe (90 degree) in fill port.
- Compress sides of finger while withdrawing air into syringe.
- Remove air-filled syringe.
- Add simulated blood glucose solution:
- Insert 27 g needle/3 ml syringe (90 degree) filled with simulated blood glucose solution.
- Use steady pressure to fill bladder until full and bladder area is palpable.
- Withdraw air bubbles from the bladder:
- Before removing needle, withdraw air by compressing the bladder area with finger in downward position, port up, while pulling back on syringe plunger.
Option: Pre-Puncture Site
Purpose: To ensure that the one puncture site will produce a sufficient blood drop size to fill the testing strip and activate the glucometer.
Method: Use a 28 gauge lancet to puncture one bladder. This creates the optimal size for blood drop. If no drop is obtained, massage area until present. Once the first drop is visible, the subsequent blood drops will occur with minimal massage or pressure. For subsequent punctures for glucose testing, use 30-32 gauge in same area. These punctures will not create additional bleeding sites. With compression on the bladder, as you hold the finger, the “pre-puncture site” will produce a consistent drop. If needed, pressure can be applied to the bladder system by pressing the opposite bladder. Alternatively, the wearer can use the opposite hand to “hold” the base of the SAFinger® overlay as if trying to steady it, and the back finger can be used to compress the bladder system.
Benefit: The smaller-size lancet will not create a drop, and the blood will come from the pre- puncture site. This allows multiple use of the finger as opposed to creating multiple puncture sites.
Storage of Model
Remove fluid from the finger after use.
Obtaining Blood Sample
Supplies Needed:
- Lancet 30-32 g
- Lancet Device
- Glucometer & test strip
- Alcohol pad
- Gauze
Procedure:
- Load the lancet device with 30-32 gauge lancet.
- Prepare glucometer and insert test strip.
- Position the hand and SAFinger® overlay in dependent position.
- Puncture SAFinger® overlay.
- Discard first drop. Fill test strip to activate glucometer.
Clear, no-skin-color model used for demonstration of bladder location
About JC3 Innovations®
JC3 Innovations® is an emerging healthcare simulation products developer/retailer in Overland Park, Kansas. The business was created by Johnson County Community College Foundation, Inc., and proceeds from the sale of JC3 Innovations® products are directed to the Foundation for student scholarships and educational purposes.
JC3 Innovations® provides students with hands-on projects in career fields tied directly to a real-world product as the basis for learning/collaboration. Students in nursing, graphic design and marketing collaborated in 2016 to launch JC3 Innovations’® first product, and the business continues to present opportunities rarely found at the community college level.
For questions about JC3 Innovations®, email us.
To order or for more information, visit the the Zamierowski Center for Healthcare Simulation website.
About JCCC
Johnson County Community College (JCCC) in Overland Park is the largest community college in Kansas. As part of the Kansas City metro area, it attracts students from Missouri, Kansas and around the world. As a League for Innovation in the Community Colleges member, it aims for the highest level of academic excellence.